Use the Flow Layout nodes to arrange nodes along a line. When a line runs out of space, the Flow Layout node places its child nodes in a new line. You can use a Flow Layout node to arrange content in the same way you would arrange it on a page.
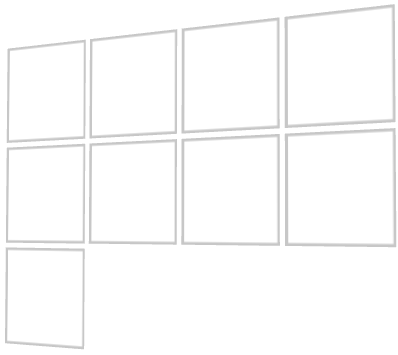
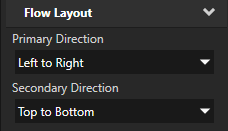
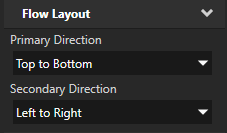
Flow Layout node iterates through its child nodes in the order you add them and first arranges items along the line set in the Primary Direction property. When a Flow Layout node runs out of available space in the direction set by the Primary Direction property, it creates a new line along the direction you set in the Secondary Direction property. See Setting the direction of a Flow Layout node.
You can set the direction and the starting point for arranging Flow Layout 3D child nodes on x, y, and z axes, and Flow Layout 2D child nodes on x and y axes.
To create a Flow Layout node:
In the Preview select the Flow Layout 2D tool  to create a Flow Layout 2D node by clicking and dragging in the Preview.

(Optional) To clear the area around child nodes in a layout, in the Project select child nodes in the layout, in the Properties click  , and add and set the margin properties:
For a Flow Layout node you can set both the starting point and the direction in which the Flow Layout node arranges its child nodes.
To set the direction of a Flow Layout node:
For example, to arrange items in a flow layout according to the rules used in:
To set the appearance of 2D nodes:


To create a Flow Layout 3D object:
// Create a Flow Layout 3D object named Flow. The default primary direction is
// left to right and secondary direction top to bottom.
FlowLayout3DSharedPtr flow = FlowLayout3D::create(domain, "Flow");
To set the width of a flow layout:
// Set the width of the flow layout to 6 device independent pixels to
// limit its size in its primary direction. By limiting the size in
// the primary direction you force it to create a new line in
// the secondary direction, when it cannot fit an item in the primary direction.
flow->setWidth(6.0f);
To add items to a flow layout:
// Flow Layout 3D arranges its items in the order you add them.
// Create a 3D object ...
Model3DSharedPtr item1 = Model3D::createBox(domain, "item1", Vector3(2.0f, 1.0f, 1.0f), ThemeRed);
// ... and add it to the flow layout.
flow->addChild(item1);
// The second item still fits in the first line.
Model3DSharedPtr item2 = Model3D::createBox(domain, "item2", Vector3(3.0f, 1.0f, 1.0f), ThemeGreen);
flow->addChild(item2);
// There is still space in the first line, but the third item is
// too large to fit, so flow layout creates a new line.
Model3DSharedPtr item3 = Model3D::createBox(domain, "item3", Vector3(5.0f, 1.0f, 1.0f), ThemeBlue);
flow->addChild(item3);
// The fourth item fits in the second line by leaving no empty space.
Model3DSharedPtr item4 = Model3D::createBox(domain, "item4", Vector3(1.0f, 1.0f, 1.0f), ThemeOrange);
flow->addChild(item4);
// Flow layout places the last item in a new line.
Model3DSharedPtr item5 = Model3D::createBox(domain, "item5", Vector3(3.0f, 1.0f, 1.0f), ThemeGreen);
flow->addChild(item5);
For details, see the FlowLayout3D class in the API reference.
To create a Flow Layout 3D object:
// Create a Flow Layout 2D object named Flow. The default primary direction is
// left to right and secondary direction top to bottom.
FlowLayout2DSharedPtr flow = FlowLayout2D::create(domain, "Flow");
To set the width of a flow layout:
// Set the width of the flow layout to 600 pixels to limit its size in its
// primary direction. By limiting the size in the primary direction you force
// it to create a new line in the secondary direction, when it cannot fit
// an item in the primary direction.
flow->setWidth(600.0f);
To add items to a flow layout:
// Flow Layout 2D arranges its items in the order you add them.
// Create a 2D object ...
EmptyNode2DSharedPtr item1 = EmptyNode2D::create(domain, "item1", 200.0f, 200.0f, ThemeRed);
// ... and add it to the flow layout.
flow->addChild(item1);
// The second item still fits in the first line.
EmptyNode2DSharedPtr item2 = EmptyNode2D::create(domain, "item2", 250.0f, 250.0f, ThemeBlue);
flow->addChild(item2);
// There is still space in the first line, but the third item is
// too large to fit, so flow layout creates a new line.
EmptyNode2DSharedPtr item3 = EmptyNode2D::create(domain, "item3", 200.0f, 200.0f, ThemeGreen);
flow->addChild(item3);
// The fourth item fits in the second line by leaving no empty space.
EmptyNode2DSharedPtr item4 = EmptyNode2D::create(domain, "item4", 400.0f, 400.0f, ThemeOrange);
flow->addChild(item4);
// Flow layout places the last item in a new line.
EmptyNode2DSharedPtr item5 = EmptyNode2D::create(domain, "item5", 150.0f, 150.0f, ThemeRed);
flow->addChild(item5);
For details, see the FlowLayout2D class in the API reference.
For lists of the available property types and messages for the Flow Layout nodes, see Flow layout 2D and Flow layout 3D.
Using the Trajectory Layout nodes
Enabling the click gesture for a node using Kanzi Studio
